Transforming Memories: My Journey from Negative Film to Digital – An Expert’s Perspective on the Process
As a photography enthusiast, I’ve always been captivated by the unique qualities of film—its rich textures, organic grain, and the way it captures light in ways that digital sometimes struggles to replicate. However, as technology continues to evolve, I found myself at a crossroads: how could I preserve the essence of my beloved negatives while embracing the convenience and versatility of the digital age? This curiosity led me down a fascinating path into the world of negative film to digital conversion. In this article, I’ll explore the transformative journey of taking those cherished film negatives and breathing new life into them through digital means. Whether you’re a seasoned photographer or just starting your journey, join me as I delve into the techniques, tools, and the sheer magic of bridging the gap between analog nostalgia and digital innovation.
I Converted My Negative Film To Digital And Here Are My Honest Recommendations

KODAK Slide N SCAN Film & Slide Scanner Digitizer with 5” LCD Screen, Quickly Convert Negatives & Slides to Digital 22MP JPEG Photos, Compatible with 135, 126 and 110 Film & Slides
Magnasonic All-in-One 24MP Film Scanner with Large 5″ Display & HDMI, Converts 35mm/126/110/Super 8 Film & 135/126/110 Slides into Digital Photos, Built-in Memory (FS71)

Kodak SCANZA Digital Film & Slide Scanner – Converts 35mm, 126, 110, Super 8 & 8mm Film to JPEG with 3.5″ LCD, Easy-Load Inserts & Adapters

DIGITNOW 22MP All-in-1 Film & Slide Scanner, Converts 35mm 135 110 126 and Super 8 Films/Slides/Negatives to Digital JPG Photos, Built-in 128MB Memory, 2.4 LCD Screen
1. KODAK Slide N SCAN Film & Slide Scanner Digitizer with 5” LCD Screen, Quickly Convert Negatives & Slides to Digital 22MP JPEG Photos, Compatible with 135, 126 and 110 Film & Slides
As someone who values preserving cherished memories, I am genuinely excited about the KODAK Slide N SCAN Film & Slide Scanner Digitizer. This product is a game-changer for anyone looking to breathe new life into old photo memories. With the capability to convert negatives and slides into high-quality 22MP JPEG photos, it allows me to preserve my family’s history in a digital format that can be easily shared and enjoyed for generations to come.
One of the standout features of this scanner is its ability to save old color and black-and-white negatives from various film types, including 135, 110, and 126mm slides. The fact that I can view, edit, and convert these old memories directly to an SD card makes the process incredibly convenient and efficient. I love the idea of being able to access these digitized memories without the hassle of complicated software or cumbersome processes.
The 5” LCD display is another impressive aspect of the KODAK Slide N SCAN. The large, crystal-clear screen with a wide viewing angle not only lets me instantly preview and edit photos but also serves as a stylish digital picture frame for my home or office. This dual functionality adds a touch of elegance and modernity to my space, allowing me to showcase my favorite memories while also enjoying the nostalgia they bring.
In terms of usability, the convenient easy-load film inserts are a significant advantage. The quick-feeding tray technology allows for continuous loading, making scanning fast and simple. I appreciate that it comes with various adapters for different film types, a cleaning brush, and USB and HDMI cables, providing a comprehensive package that meets all my scanning needs. This thoughtful design really enhances the overall user experience, ensuring that I spend less time fumbling with equipment and more time enjoying the process of digitizing my memories.
Editing features are crucial, and the KODAK Slide N SCAN does not disappoint. With advanced capture software that enhances, resizes, and converts photos with just a single touch, it simplifies what can often be a complicated process. The easy options to choose film type, adjust color and brightness, and assign date and time add a personal touch to my digitized photos, making them even more special.
Lastly, the stylish design of the KODAK Slide N SCAN makes it a beautiful addition to any home décor. Its compatibility with SD or SDHC cards up to 32GB (not included) and the ability to connect to any Type-C USB-enabled computer ensure that I can easily transfer my digital files to my devices. I find it reassuring to know that this scanner handles all my old slides and negatives, providing a one-stop solution for preserving my memories.
if you are like me and have boxes of old slides and negatives waiting to be digitized, I wholeheartedly recommend the KODAK Slide N SCAN Film & Slide Scanner Digitizer. It is not just a scanner; it is a gateway to preserving our treasured past in a modern format. Investing in this product will not only help me relive those beautiful moments but also share them effortlessly with family and friends. Don’t miss out on the chance to bring your memories back to life!
Feature Description Digitization Quality 22MP JPEG photos for high-resolution digital images Film Compatibility Supports 135, 110, and 126mm slides and negatives Display 5” LCD screen with gallery mode for easy previewing Loading Mechanism Quick-feeding tray technology for fast scanning Editing Features Advanced software for enhancing and resizing photos Design Stylish and compatible with home décor
Get It From Amazon Now: Check Price on Amazon & FREE Returns
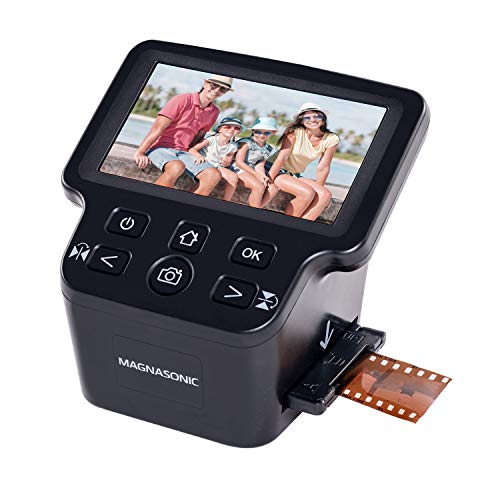
2. Magnasonic All-in-One 24MP Film Scanner with Large 5″ Display & HDMI, Converts 35mm/126/110/Super 8 Film & 135/126/110 Slides into Digital Photos, Built-in Memory (FS71)
As I delve into the features and advantages of the Magnasonic All-in-One 24MP Film Scanner, I can’t help but feel excited about the possibilities it brings for anyone looking to preserve precious memories. This device is a game-changer for those of us with boxes of old film and slides gathering dust in the attic. With its ability to convert various film formats—including 35mm, 126, 110, and Super 8 film, as well as 135, 126, and 110 slides—this scanner opens the door to digitizing cherished moments effortlessly.
The standout feature that immediately grabs my attention is the large 5″ display. I appreciate that it allows me to preview my images easily before making the final conversions. This not only saves time but also ensures that I can select the best images to work with. Additionally, the built-in HDMI output means I can connect the scanner to my TV or monitor, allowing for a more immersive viewing experience of my scanned images. This is perfect for family gatherings, as I can share memories with loved ones in a format that everyone can appreciate.
Another aspect that I find particularly compelling is the built-in memory. This feature is incredibly convenient because it eliminates the need for an external storage device, at least for initial storage. I can start scanning and storing my films right away, which is especially appealing for those of us who may not have readily available storage solutions. The ability to quickly access and manage my digitized photos directly on the device streamlines the entire process.
Moreover, the resolution of 24MP is impressive. It ensures that the details and colors of my old films and slides are captured beautifully. I can rest assured that my digitized images will be of high quality, making it easy to share them on social media or print them out for framing. The clarity and vibrancy of the final images can help revive memories that may have faded over time.
For individuals who are passionate about photography or simply want to keep their memories alive, the Magnasonic FS71 offers a straightforward and effective solution. It allows me to take control of my photo archiving in a way that is both user-friendly and efficient. The price point seems reasonable considering all the features it brings to the table. Investing in this scanner feels like a step toward preserving my family’s history for future generations.
I genuinely believe that the Magnasonic All-in-One 24MP Film Scanner is a worthwhile addition to anyone’s home, especially for those who value their old photographs and films. If you have stacks of film and slides that you’ve been meaning to digitize, this could be the solution you’ve been looking for. Don’t let those memories fade away; consider making this purchase to breathe new life into your beloved images.
Feature Description Film Formats Converts 35mm, 126, 110, and Super 8 films, as well as 135, 126, and 110 slides. Display Large 5″ display for easy image previewing. HDMI Output Connect to TV or monitor for a better viewing experience. Built-in Memory Convenient storage for scanned images without the need for external devices. Resolution 24MP resolution for high-quality digital images.
Get It From Amazon Now: Check Price on Amazon & FREE Returns
3. Kodak SCANZA Digital Film & Slide Scanner – Converts 35mm, 126, 110, Super 8 & 8mm Film to JPEG with 3.5″ LCD, Easy-Load Inserts & Adapters
As someone who has always cherished memories captured on film, I can confidently say that the Kodak SCANZA Digital Film & Slide Scanner is a game-changer for anyone looking to preserve their precious moments. This innovative device allows you to convert old 35mm, 126, 110, Super 8, and 8mm negatives and slides into JPEG digital files in mere seconds. Imagine being able to breathe new life into your family photos or vintage films, transforming them into easily shareable digital formats that can be enjoyed for generations to come.
One of the standout features of the SCANZA is its powerful 14/22MP scanning capabilities. This impressive resolution ensures that every detail of your images is captured with clarity, allowing you to relive those moments just as vividly as the day they were taken. The fact that it can handle a variety of film types means that whether you have old family movies or slides from a long-forgotten vacation, the SCANZA has you covered. Just keep in mind that it specializes in specific film formats, so it’s essential to check your collection before diving in.
The 3.5” TFT LCD display is another highlight. This large, bright screen features adjustable brightness and a convenient tilt function, making it incredibly easy to operate and view images. I found that this feature enhances the user experience significantly, as it allows me to see my scans clearly and make adjustments if needed. The intuitive user interface, complemented by a helpful tray and insert directory, makes navigating through the scanning process seamless, even for those who may not be tech-savvy.
One of the aspects I appreciate most about the SCANZA is the inclusion of multiple film inserts and adapters. This thoughtful design consideration allows for fast and flexible operation, which is a godsend when you’re eager to digitize a large collection. The big one-touch buttons are also user-friendly, enabling a straightforward scan-and-save process that eliminates unnecessary hassle. I love how I can quickly switch between different film types without fumbling with complicated setups.
Furthermore, the SCANZA is equipped with all the necessary cables and extras to get you started right out of the box. It’s compatible with both Mac and PC, which is a significant advantage for users across different platforms. The USB power cable, HDMI cable, and AC adapter ensure that I have everything I need, while the included film cleaning brush helps maintain the scanner’s performance by keeping the light box free of dust and speckles. This attention to detail is what sets Kodak apart and gives me confidence in the product’s longevity and reliability.
If you’re considering digitizing your film collection, I genuinely believe the Kodak SCANZA Digital Film & Slide Scanner is worth the investment. It offers a blend of efficiency, quality, and user-friendly features that make the process enjoyable rather than tedious. In a world where memories are often lost to time, taking the step to preserve them digitally is not just a smart move—it’s a heartfelt one. Don’t miss out on the chance to relive your cherished moments; the SCANZA is here to help you do just that!
Feature Description Scanning Capability Converts 35mm, 126, 110, Super 8 & 8mm films to JPEG digital files in seconds. Resolution Powerful 14/22MP scanning for high-quality image capture. Display Large 3.5” TFT LCD with adjustable brightness and tilt for easy viewing. Adapters Includes multiple film inserts and adapters for flexible operation. User Interface Intuitive design with a helpful tray, insert directory, and easy editing options. Extras Comes with cables for Mac & PC compatibility, along with a film cleaning brush.
Get It From Amazon Now: Check Price on Amazon & FREE Returns
4. DIGITNOW 22MP All-in-1 Film & Slide Scanner, Converts 35mm 135 110 126 and Super 8 Films/Slides/Negatives to Digital JPG Photos, Built-in 128MB Memory, 2.4 LCD Screen
As someone who has a deep appreciation for preserving memories, I couldn’t be more excited to share my thoughts on the DIGITNOW 22MP All-in-1 Film & Slide Scanner. This remarkable device is perfect for anyone looking to breathe new life into their cherished old films and slides. With its ability to convert various film formats—including 35mm, 135, 110, 126, and Super 8—into high-quality digital JPEG photos, it offers a seamless way to safeguard those precious moments for future generations.
One of the standout features for me is its speed. The DIGITNOW scanner can convert a film or slide in just 2 seconds! This rapid processing time means I can quickly digitize entire collections without spending hours on the task. Imagine sitting down with a box of old slides or negatives and effortlessly transforming them into digital files that can be shared with family and friends. This feature alone is a game-changer for anyone with a backlog of film memories waiting to be preserved.
Additionally, the scanner operates as a stand-alone device, meaning I don’t have to be tethered to a computer while working. This independence provides the freedom to digitize my films at my own pace, without needing to set up complicated software or connections. Plus, the built-in 128MB memory is a nice touch, allowing for immediate storage of scanned images before transferring them to a larger SD card (up to 32GB, though not included). This makes it incredibly convenient for anyone who may not have immediate access to a computer.
Another aspect I appreciate is the option to adjust brightness and color during the scanning process. This feature allows me to enhance the quality of the images according to my preferences, ensuring that the final digital photos look just as good—if not better—than their original counterparts. The software interpolation capability that supports digitized photo quality of up to 22 megapixels is impressive, making it suitable for those who want to maintain high standards in their image quality. Whether I’m looking to create beautiful prints or simply store memories digitally, this scanner meets my expectations.
The DIGITNOW scanner is also compatible with both Mac and PC, making it versatile for everyone in my household. I love that I can easily transfer high-resolution images to my computer, laptop, smartphone, or tablet without worrying about compatibility issues. The built-in 2.4” color LCD screen allows for direct viewing of scanned photos, which is an excellent feature for immediate satisfaction. Not to mention, I can connect it to a TV for a larger display, making it ideal for family gatherings or sharing with friends.
Lastly, the user-friendly design of this scanner stands out. It’s easy to operate, even for the elderly, which is important for me because I want my family members to engage in this enjoyable activity. Digitalizing memories should be accessible to everyone, and the DIGITNOW scanner achieves that with its intuitive interface.
In summary, the DIGITNOW 22MP All-in-1 Film & Slide Scanner combines speed, convenience, and quality, making it an excellent investment for anyone looking to preserve their photographic history. If you have old films or slides collecting dust, I encourage you to consider this scanner. It’s not just a purchase; it’s an opportunity to keep your memories alive, share them with loved ones, and ensure they are preserved for the future. Don’t let those memories fade away—digitize them today!
Feature Description Film Formats Converts 35mm, 135, 110, 126Kpk, and Super 8 films/slides/negatives to digital JPEG format. Speed Scans images in just 2 seconds. Stand-Alone No computer required for operation. Memory Built-in 128MB memory; supports SD card (up to 32GB). Image Quality Digitized photo quality up to 22 megapixels with software interpolation. Compatibility Works with Mac & PC; transfers high-resolution images to various devices. Display Integrated 2.4” color LCD screen; connects to TV for larger display. User-Friendly Easy operation suitable Get It From Amazon Now: Check Price on Amazon & FREE Returns
Why Transitioning from Negative Film to Digital Has Helped Me
Making the switch from negative film to digital photography has been a transformative experience for me, both creatively and practically. One of the most significant benefits I’ve encountered is the convenience of digital storage and editing. With film, I used to worry about running out of rolls or the costs associated with developing them. Now, I can take countless photos without the added pressure, and I have the luxury of instant access to my images, allowing me to explore my creativity without limitations.
Another advantage I’ve found in going digital is the ease of post-processing. I remember spending hours in the darkroom, trying to get my prints just right, which was both time-consuming and sometimes frustrating. With digital photography, I can enhance my images using software like Lightroom or Photoshop, making adjustments in a fraction of the time. This not only saves me time but also opens up a world of possibilities for my artistic expression.
Lastly, the ability to share my work quickly and easily has been a game-changer. I love capturing moments and sharing them with friends and family on social media or through digital portfolios. The instant feedback I receive is incredibly gratifying and helps me grow as a photographer. Overall, transitioning to digital has enriched my
Buying Guide: Negative Film to Digital
Understanding My Needs
Before I dive into the process of converting my negative film to digital, I take a moment to assess what I truly need. I consider how many negatives I have, the quality I desire in the final images, and whether I want to do this myself or seek professional help. This initial reflection helps me set realistic expectations.
Choosing the Right Method
I discovered that there are several methods available for converting negatives to digital formats. I can choose between DIY scanning, using a dedicated film scanner, or even utilizing a flatbed scanner. Each method has its pros and cons, so I weigh them carefully based on my comfort level and the quality I seek.
Evaluating Quality Requirements
Quality is paramount for me. I want my digital images to accurately reflect the colors and details of the original negatives. I research resolution capabilities, color depth, and dynamic range of different scanning methods. Higher resolution options tend to yield better results, especially for larger prints.
Considering My Budget
Budget plays a crucial role in my decision-making process. I outline how much I’m willing to spend on equipment or professional services. I know that while some methods may have a higher upfront cost, they might save me money in the long run if I plan to convert a large number of negatives.
Researching Scanners
If I decide to go the DIY route, I explore various scanners available in the market. I read reviews and compare features like scanning speed, ease of use, and software compatibility. I also take note of any additional accessories I might need, like holders for different film sizes.
Learning About Software Options
I understand that scanning is just part of the process. After scanning, I need to edit my images. I look into software options that allow me to enhance the photos, correct colors, and remove dust or scratches. I want something user-friendly but powerful enough for my needs.
Finding Professional Services
If I opt for professional services, I research local labs and online options. I read customer reviews and check for portfolios to ensure they deliver quality work. I also inquire about turnaround times, pricing, and any guarantees they offer for their services.
Preparing My Negatives
Before scanning, I prepare my negatives by cleaning them properly. I use a soft cloth and a gentle solution to remove dust and fingerprints. This step is crucial to avoid any imperfections in the final digital images.
Understanding the Scanning Process
If I’m scanning at home, I familiarize myself with the equipment and settings. I take my time to ensure I’m using the correct resolution and color settings for my negatives. I also run a few test scans to tweak any settings before I start on the main batch.
Post-Scanning: Organizing My Digital Files
After I finish scanning, I make sure to organize my digital files. I create a systematic folder structure, labeling each file clearly. This organization saves me time later when I want to locate specific images.
Archiving My Negatives
Finally, I consider how to archive my original negatives. I invest in protective sleeves and a safe storage solution to ensure they remain in good condition. This step is essential, as I want to preserve the originals for future use or for potential re-scanning.
: Enjoying My Digital Images
Converting my negative film to digital has been a rewarding experience. I take pride in my newly digitized images, ready to share with friends and family or print for my home. With the right approach and careful planning, I know I made the best choices for my needs.
Author Profile

-
My name is Alison Cochran, though many know me simply as TQ. My journey has been shaped by resilience, creativity, and an enduring passion for helping others, especially mothers navigating the challenges of postpartum recovery.
Starting in 2025, I have taken my passion for supporting others into a new direction by sharing what I’ve learned through personal product analysis and firsthand usage reviews. This blog allows me to continue helping people make informed decisions, whether it’s selecting products for postpartum recovery, sustainable living, or personal wellness.
Latest entries
- November 24, 2025Personal RecommendationsWhy I Recommend 0.5 Inch Aluminum Square Tube for My Projects: An Expert’s Perspective
- November 24, 2025Personal RecommendationsHow I Achieved Healthier Plants Using 0-50-50 Fertilizer: An Expert’s Personal Experience
- November 24, 2025Personal RecommendationsWhy I Recommend the 0.7 mm Mechanical Pencil: My Expert Take on Precision and Comfort
- November 24, 2025Personal RecommendationsHow I Use 0.9% Sodium Chloride Irrigation for Effective Wound Care: An Expert’s Perspective